
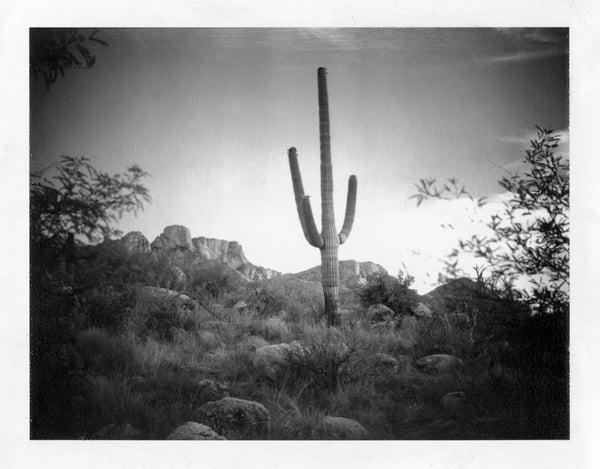
Polaroid 665 Negative (Exp. '09)
50mm Pinhole Camera (10-Second Exposure)
Dear All,
Chris here from ONE INSTANT! In this post, we are excited to share our blogosphere with a guest contributor, specifically our friend, and excellent writer/photographer, Aidan Avery from Tuscon, AZ.
He was gracious enough to do an in-depth review and write-up of our ONE INSTANT DIY camera kit. Not only does he show what amazing photography is possible with our funky little camera, but he does a good job of demystifying the assembly procedure and even shows you how you can shoot packfilms other than ONE INSTANT without losing any functionality! Without further ado, let's let Aidan take the helm...
* * * *
A SHOOTER'S PERSPECTIVE ON THE ONE INSTANT DIY CAMERA - BY AIDAN AVERY
Over the last month, I’ve reveled in the hands-on, do-it-yourself goodness of SUPERSENSE’s ONE INSTANT DIY camera — a limited-edition offering that arrives ready to be built into a powerhouse peel-apart film camera.
The ONE INSTANT DIY kit actually comprises four cameras: three pinhole cameras of varying focal lengths and a sliding box view-camera with a lens. Philosophically, the package is an apt companion to SUPERSENSE’s peel-apart film in that it too brings a hand-made approach to peel-apart photography. (In this case, the hands that make the camera are the photographer’s own). Like ONE INSTANT film, the DIY camera recalls a historical design and repurposes legacy materials—namely, a Fujifilm PA-1 packfilm back and, for the sliding box camera, a 108mm f/4.5 Polaroid Copal lens.
Over the last month I’ve discovered that, also like its namesake film, the ONE INSTANT DIY camera is a unique piece of photographic technology that rewards a thoughtful, intentional approach with high-caliber peel-apart imagery.

ONE INSTANT P7 Color Film
ONE INSTANT DIY Sliding Box Camera (f/9.5, 1/15)
THE BUILD
When the kit arrived from Vienna, I splayed out the parts on a table and cleared a work area on the floor below. I had looked over the ONE INSTANT DIY camera microsite and store page. Still, the materials’ high quality impressed me. In hand, the birch pieces that would form the cameras were sturdy and cleanly cut. The lens and film holder — both new-old-stock — were immaculate. And SUPERSENSE had artfully shaped the focusing screen to slip into, and magnetically grip, the back of the PA-1 film holder.

From the box, I also unearthed all sorts of smaller material treasures: a cube of beeswax to lubricate the sliding box camera, a quarter-sized cylinder containing black Indian ink to stain the wood, a canister of putty to fill any gaps, two grades of sandpaper, a sanding block, and more.
Nobody would mistake me for being “handy” when it comes to construction, but building the DIY camera(s) was enjoyably messy and even intuitive. I dabbed glue. I hammered birch pieces together. I puttied. I swabbed ink onto wood. I sanded, inspected, and then inked some more. Finally, I screwed the Polaroid lens into place. Having lost my latex gloves, with ink-stained hands and fingertips coated in glue I laid my work out to dry — proof that building the camera didn’t require construction know-how.
In the well-illustrated instructions, I especially appreciated the steps that left minor functional and aesthetic decisions up to the builder-photographer. Exactly how much would I sand the connecting parts of the sliding box camera? (Until they’re ultra-smooth, I decided.) How much beeswax would I use to lubricate their slide? (All of it, I declared.)
By the time I’d finished, I’d depleted nearly everything in the box — every drop of ink wood stain, all four sheets of sandpaper, and the entire jar of glue. SUPERSENSE had allotted the perfect amount of each. And, since none of the materials are toxic (not even the glue), the camera exemplifies the careful and efficient use of materials I’ve come to expect from SUPERSENSE. Very little waste, and environmentally-friendly components.

THE SLIDING BOX CAMERA
A limited-edition, build-it-yourself camera is a niche product, no doubt. Nonetheless, I’d been anticipating adding the box camera to my arsenal since its 2022 release. Like for many others, discontinued peel-apart film and reinvented ONE INSTANT peel-apart film have played a growing role in my artistic practice. And upon release, the DIY camera filled an important gap in peel-apart image making: it is the only peel-apart camera to offer through-the-lens composition, full film coverage, and precise frame-edge indication.
With a focusing screen that sits in the PA-1 film back, the camera’s projected image is exactly what the film will record. In fact, using the box camera was the first time I’d ever felt total assurance while composing for Type 100-sized peel-apart film. For me, this alone makes the camera a serious piece of instant film machinery. (Not to mention, I found a special joy in seeing the image projected from the lens onto the focusing screen, then imagining how what I saw on the screen would translate onto my peel-apart film.)
Polaroid 665 Positive (Exp. ’09)
Sliding Box Camera (f/4.5, 1/30, Yellow Filter)
I rolled into Catalina State Park in Arizona amidst swarming wasps and a 109° Fahrenheit (43° C) heatwave. Neither of those, it turned out, would dampen an incredibly satisfying first experience with the DIY camera.
Set up at a saguaro cactus near the Catalina mountains, I discovered that the camera’s small size, with little internal light falloff, produces a stunningly bright image on the focusing screen. Focusing the camera is akin to focusing a 4x5 camera. It involves sliding the front standard (or, in this case, front part of the box) forward or backward until the subject is sharp, then locking the box into place. Without precision gears, this initially requires a bit of patience, but the beeswax lubricant is slick and gets slicker with each use. After just a few trial runs I was able to focus the box camera as fast as I would a large format view camera.
The vintage Polaroid triplet lens immediately charmed me. At 108mm, the lens falls into the same general focal length category as packfilm Land Cameras. It’s wide enough for landscape, but tight enough for portraiture. Wide open (at f/4.5), like in the shot of the saguaro cactus, the Polaroid lens displays all sorts of personality, including vignetting, edge softness, and a very shallow depth of field. Stopped down, like in the opening ONE INSTANT shot of Christy, all vignetting is gone and the image is sharp from corner to corner. (Even at its widest, though, the lens is incredibly sharp for a peel-apart film camera. See, for example, the comparison of the Polaroid Type 665 positive and negative of the cactus shot here.)
After just one trek into the desert and one portrait shoot, I was already enamored with the slower, methodical process of shooting peel-apart film with the sliding box camera, as well as with images it produced.

Polaroid 665 Positive (Exp. '09)
ONE INSTANT DIY Sliding Box Camera (f/6.7, 1/15)
THE PINHOLE CAMERAS
If the sliding box camera is the DIY package’s high-end artistic instrument, the pinhole cameras are wonderfully experimental counterparts. They afford long exposures, wide fields of view, and the magic of pure, unobstructed light and time impressing themselves onto film.
Shooting with the pinhole cameras involves the PA-1 back and a magnetic, removable cap that sits over the pinhole and works interchangeably between the three cameras. Snapped into place, the cap rotates open to expose the film and swivels back to conclude exposure. Opening and closing the cap smoothly requires a certain “touch,” similar to focusing the sliding box camera, which is easily learned with a little practice.

Fujifilm FP-100c (Exp. ’12)
50mm Pinhole Camera (20-Second Exposure)
The three laser-cut pinholes each deliver impressive clarity, while the cameras offer varying degrees of wideness in perspective: standard wide angle (50mm), ultra wide angle (35mm), or eye-popping and perspective-bending wide angle (20mm). Without the luxury of a lens and focusing screen, composing with any of the pinhole cameras is necessarily an experiment unto itself. But such is the joy of pinhole photography.
A quick tip for composition: Reverse-trace from the film’s edges out the pinhole to imagine the camera’s field of view (without forgetting, of course, that precision and pinhole-ism are practically antithetical).

Polaroid 665 Negative (Exp. ’09)
35mm Pinhole Camera (1-Minute Exposure)
Between the distinct qualities of pinhole photography (soft visuals, natural vignetting, movement captured over long periods of time) and the equally distinguishable qualities of peel-apart film (saturated colors, endearingly unpredictable results, and other artifacts of expiration), the creative possibilities of the DIY pinhole cameras are inexhaustible. So far, I’ve had the most success with the 35mm and 50mm. My current pursuit is capitalizing on the 20mm’s fish-eye-like perspective, which holds the potential for mind-bending imagery.
FINAL TIP: SHOOTING PACKFILM IN THE DIY CAMERA

The ONE INSTANT DIY camera is made specifically for ONE INSTANT, single-shot cartridges. For me, though, its long-term viability hinged on whether or not I could also use it with the packfilm stashed in my minifridge. Without a darkslide in the modified PA-1 back, switching between cameras or using the focusing screen in the middle of a pack posed a challenge. However, I came up with three situation-dependent solutions to shoot packfilm seamlessly in the DIY camera. The only additional requirement is a film changing bag.
-
To shoot packfilm with one of the pinhole cameras, just load the pack and let it rip. No need for the changing bag.
-
To switch between pinhole cameras, or from the sliding box camera to a pinhole camera, in the middle of a pack, bring the current setup and the desired pinhole camera into the changing back. In the bag, put the new pinhole camera on PA-1 back. (Don’t forget to swap the pinhole cap over as well.)
-
To use the sliding box camera’s view screen in the middle of a pack, save the packfilm darkslide after pulling it for the first shot. When it’s time to refocus or recompose, bring the box camera into the changing bag and remove the film from the PA-1 back. Then, unclip the back of the packfilm’s shell and remove the film. Gently wrap the darkslide around the film, put the film back into its case, and re-clip the back in place. Now the changing bag can be opened safely, the focusing screen put back into the camera, and the packfilm used anew after composition.
Opening the packfilm case may be unfamiliar, but with practice it’s quick, simple, and hard to mess up. The extra 10-15 seconds it takes were well worth the ability to render images on my old packfilm using the sliding box camera and lens.
* * * *
Finally, thank you to Chris Holmquist, SUPERSENSE’s mastermind behind the DIY camera (and ONE INSTANT). Last year I tried to design a rudimentary pinhole box camera myself, and the result was clunky and impractical. The more time I spend with the ONE INSTANT DIY camera, however, the more deeply I appreciate Chris’s artful engineering. I’ll be happy to make this inventive, through-the-lens camera my primary peel-apart shooter for years to come.
—Aidan

* * * *
Thank you Aidan!
For more images from the ONE INSTANT DIY camera, or to ask Aidan any questions about his experience using it (he’s happy to answer!), find him on Instagram or his website.
We can't thank him enough for lending his talents and sharing his experiences with our DIY CAMERA kit.
Best wishes from all of us at ONE INSTANT / SUPERSENSE,
- Chris
If you're interested in purchasing a ONE INSTANT DIY CAMERA KIT... click the photo below!
